
Accepting Cryptocurrency Payments on WordPress
#guides
Introduction
WordPress is the world's most popular content management system, powering more than a third of all existing websites. Blogs, online stores, e-learning platforms, subscription services, and service websites are all frequently built on WordPress because of its flexibility, free core functionality, and vast plugin ecosystem. And the more projects on this CMS work with a global audience, the stronger the demand for alternative payment methods becomes.
Card acquiring remains the primary channel, but it's not without problems. Cross-border payments are often declined by the client's bank, commissions eat up 3–4% per transaction, and chargebacks and disputes exhaust support teams. For international businesses, all these problems are painfully familiar.
Accepting WordPress payments in cryptocurrency solves these challenges at once. Transactions go through in minutes, operate 24/7 without days off, fees are several times lower, and chargebacks in crypto simply don't exist — a transaction is irreversible by its very nature. Statistics show that companies that have implemented crypto payment on average see noticeable sales growth, and clients who pay with crypto spend more than those who pay by card.
This article covers all the ways to connect cryptocurrency acceptance to a WordPress site, walks through setup checklists, and shows how to avoid common mistakes at launch.
How to Set Up Cryptocurrency Acceptance on WordPress
A WordPress site owner has three ways to connect crypto payment. They differ in complexity and will suit different types of projects.
Integration via WooCommerce
WooCommerce is a WordPress plugin that turns an ordinary website into a fully functioning online store. It holds about 30% of the global e-commerce market and is free at the basic level. If your WordPress site already has WooCommerce or you're planning to install it, this is the most popular way to accept crypto payments.
The logic is simple — WooCommerce handles products, the cart, and checkout, while a separate payment plugin adds cryptocurrency to the list of payment methods alongside cards and electronic wallets. On the order page, the client selects "pay with cryptocurrency," the system shows a payment page with a choice of coin and a QR code, they pay, and the order automatically moves to "paid" status.
WordPress Plugins
If your site is not a store but, for example, a services site, subscription platform, or blog with paid content, full WooCommerce may be overkill. In this case, specialized WordPress payment plugins are used that add a crypto checkout without complex e-commerce scaffolding. They allow generating payment links, embedding payment buttons into pages and posts via shortcodes, and accepting donations or payment for individual services.
Such a plugin is installed the same way as any other — through the plugin directory in the WordPress admin panel or by uploading a ZIP archive from the payment service's website.
API Integration
The third path is for projects with custom logic where standard plugins aren't enough. For example, if your WordPress runs a complex SaaS service, a membership club with its own access system, a platform integrated with a CRM, or a non-standard checkout. In this case, a developer connects the payment service directly via API, writing all the logic to match the project's requirements.
API integration requires developer time, but gives full control — you decide how the payment page looks, how payment notifications are handled, and how transactions are linked to client accounts. Good payment services provide documentation with code examples, so integration typically takes hours, not weeks.
Accepting Crypto Payments via WooCommerce Using a Plugin
This is the most popular scenario for WordPress stores and covers most standard use cases. Let's walk through the setup step by step.
Step 2. Register with the payment service. Create an account with a crypto acquiring service, confirm your email, and create a project for your WordPress site. At this stage, the system will provide API keys and a merchant ID — write them down, they'll be needed for plugin setup.
Step 3. Install the crypto plugin. There are two ways — download the ZIP archive from the service's official site or install the plugin directly from the WordPress directory.
Step 4. Connect the plugin in WooCommerce settings. Go to WooCommerce → "Settings" → "Payments." Your crypto plugin will appear in the list. Activate the checkbox, go to its settings, and paste the API key and merchant ID obtained in step two. Set the payment method name (for example, "Pay with cryptocurrency") — this is what the buyer will see at checkout.
Step 5. Select coins and networks. In the plugin settings, specify which cryptocurrencies and blockchain networks you're ready to accept. It's recommended to enable USDT and USDC on multiple networks (TRC-20, ERC-20), Bitcoin, and Ethereum — this set covers the majority of clients.
Step 6. Make a test payment. Before announcing the new payment method to buyers, place a trial order for a small amount, pay for it with crypto, and verify that the order status automatically changed to "paid" and a notification arrived.
The main advantage of this approach is full automation. From clicking "pay" to the "paid" status opening in WooCommerce, everything runs without your involvement. A unique wallet address is generated for each order, the service tracks confirmations in the blockchain itself, and sends the WordPress site a signal via webhook.
Connecting the Payment Plugin through WordPress
The connection process consists of two stages — first, download the plugin from the Heleket official site, then install it through the WordPress admin panel. Let's look at both stages in detail.
Stage 1. Downloading the Plugin from the Heleket Website
Step 1. Go to the website — heleket. If you're using the service for the first time, register and create a merchant — this takes a couple of minutes and doesn't require gathering documents. To create a merchant, go to your dashboard, then to the "Business" — "Merchants" section.
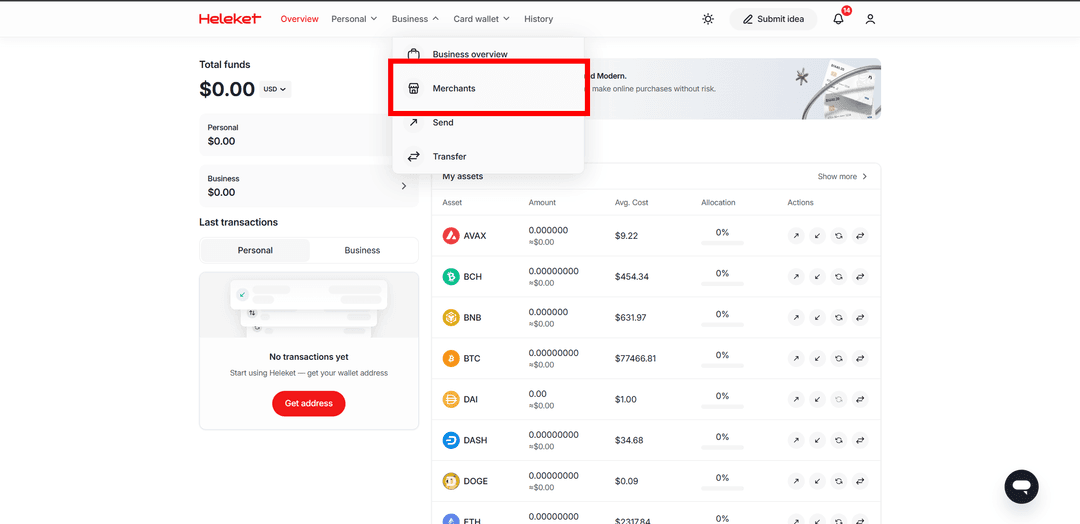
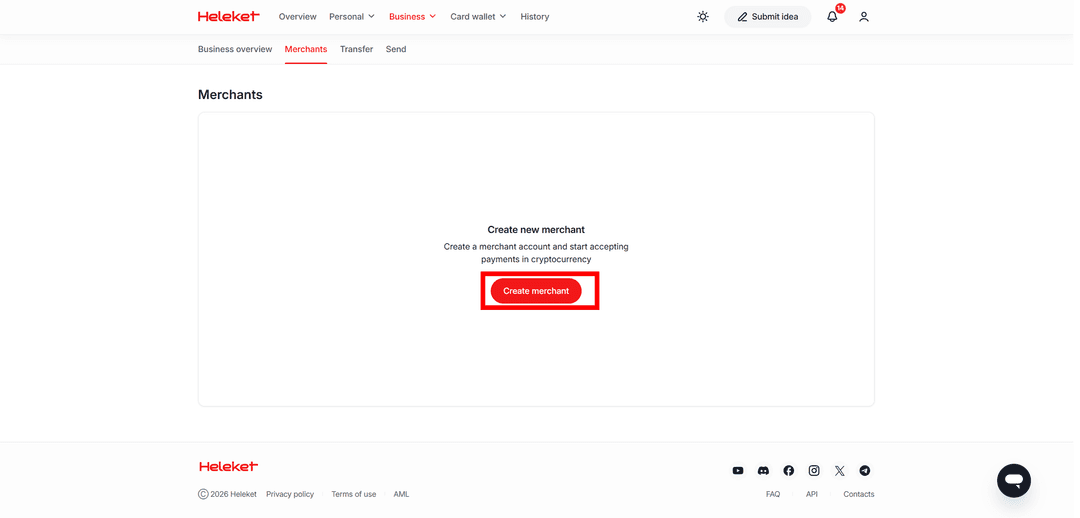
Click "Create Merchant."
Fill in the fields: merchant name, project URL, project name — and select the project type (Website or Telegram bot).
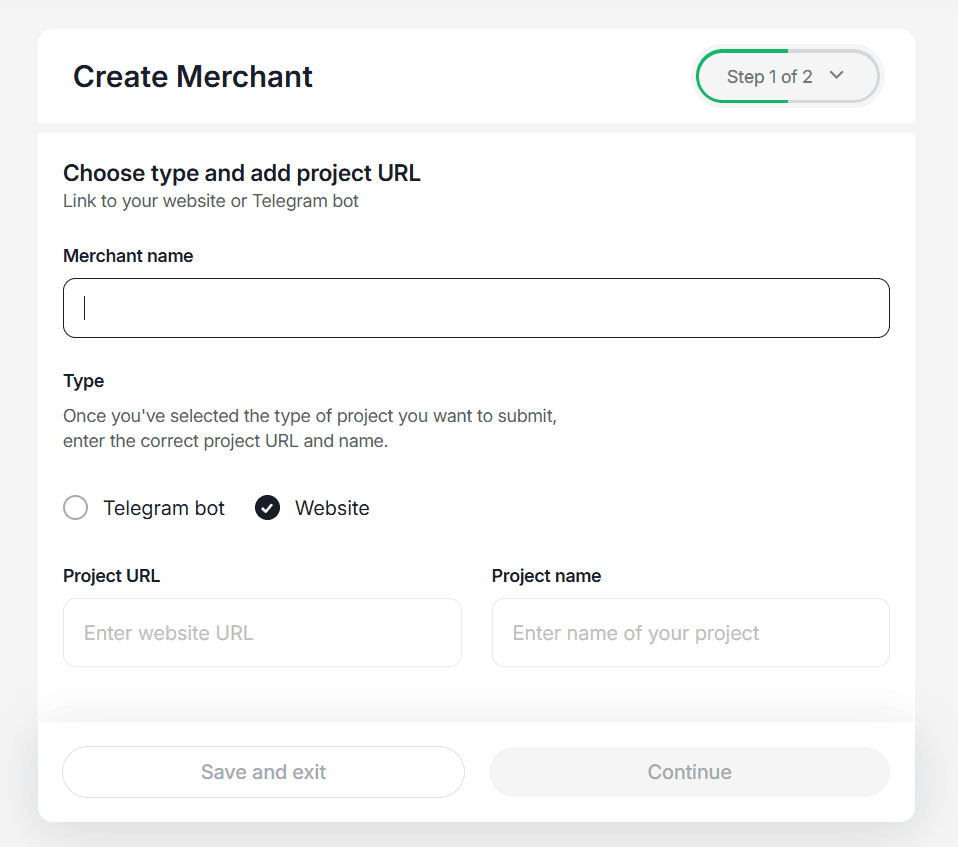
After that, you'll need to wait a few hours for the merchant to pass moderation, and you'll receive a Merchant ID and API key for accepting payments on WordPress.
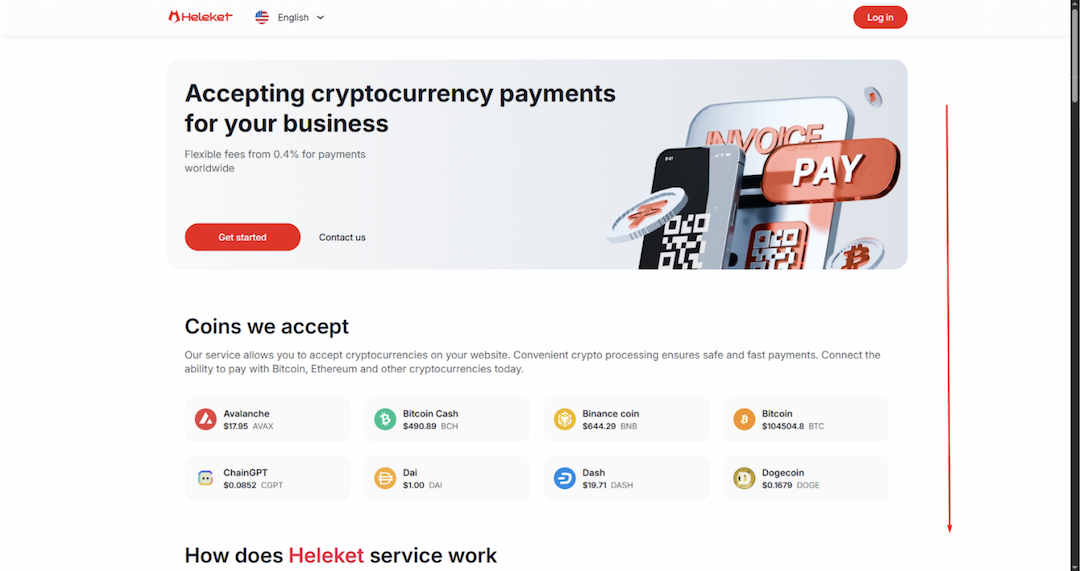
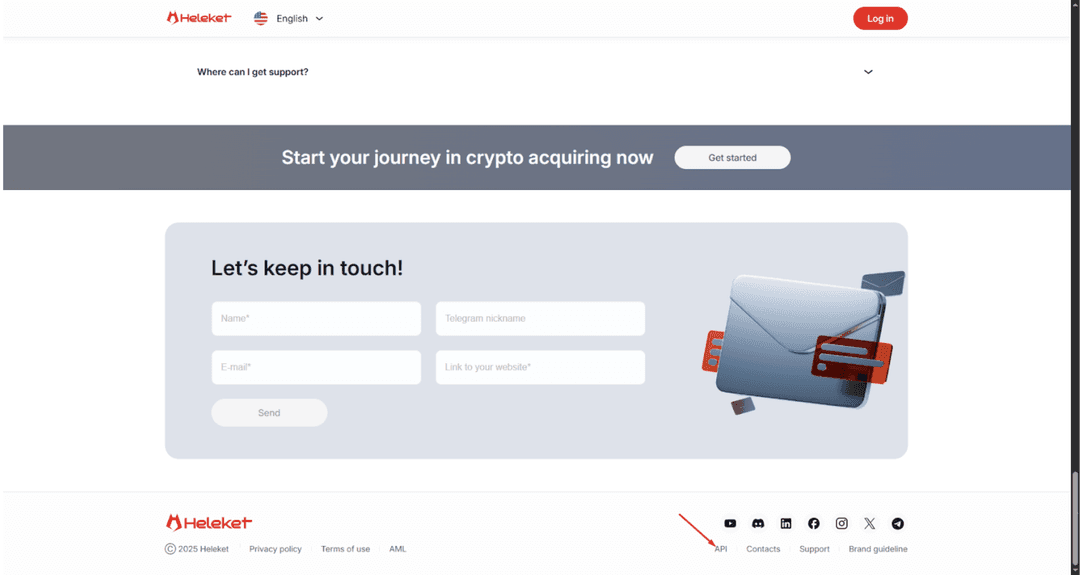
Step 3. Go to the "Modules" subsection. Inside the "API" section there is a separate "Modules" page — this is a catalog of ready-made Heleket plugins for popular CMS platforms and platforms, all in one place. Here are the ready-made integrations for WooCommerce and other systems that don't need to be written from scratch.
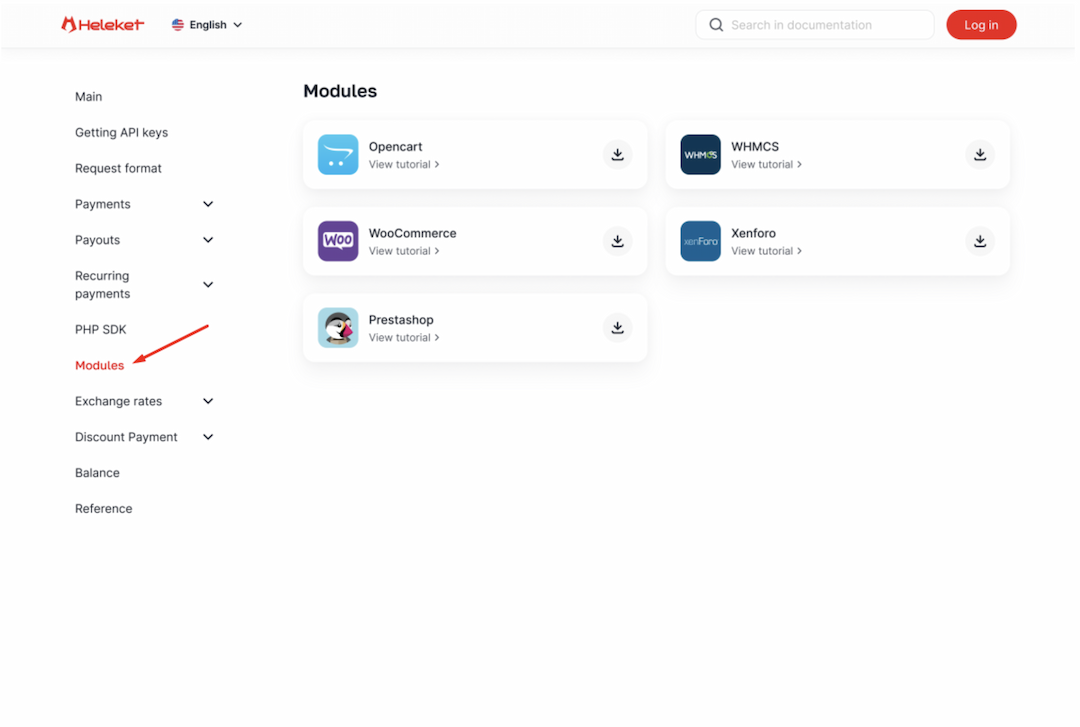
Step 4. Download the WooCommerce plugin. In the module list, find the card named WooCommerce and click the Download button. The browser will download a ZIP archive with the plugin — this is exactly the file needed for the next stage.
Stage 2. Installing the Plugin in WordPress
Once the archive is downloaded, go to the WordPress admin panel.
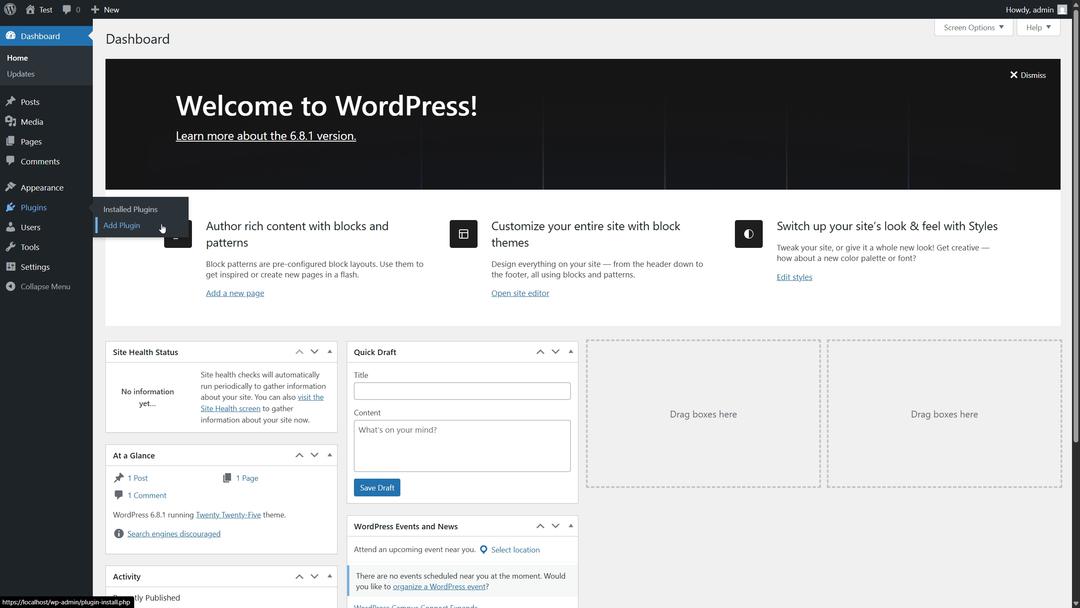
Step 2. Find Heleket through the search. In the center of the page there is an "Upload Plugin" button. Click it and select the Heleket file you downloaded from the site.
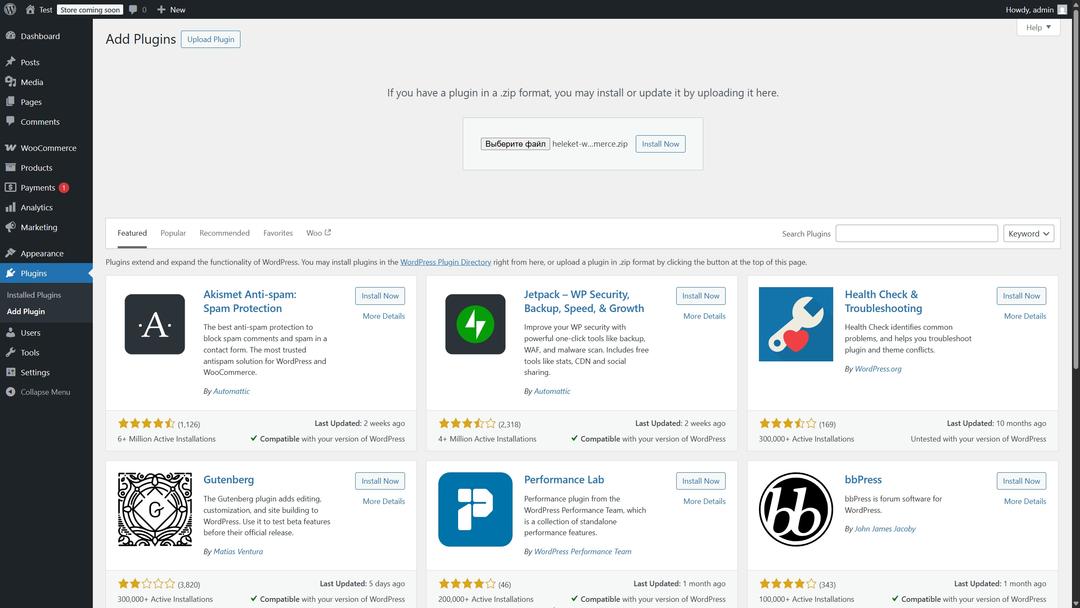
Step 3. Install the plugin. Once you've selected the Heleket file, click "Install Now." WordPress will unpack it and add it to the system. No additional manual actions are required.
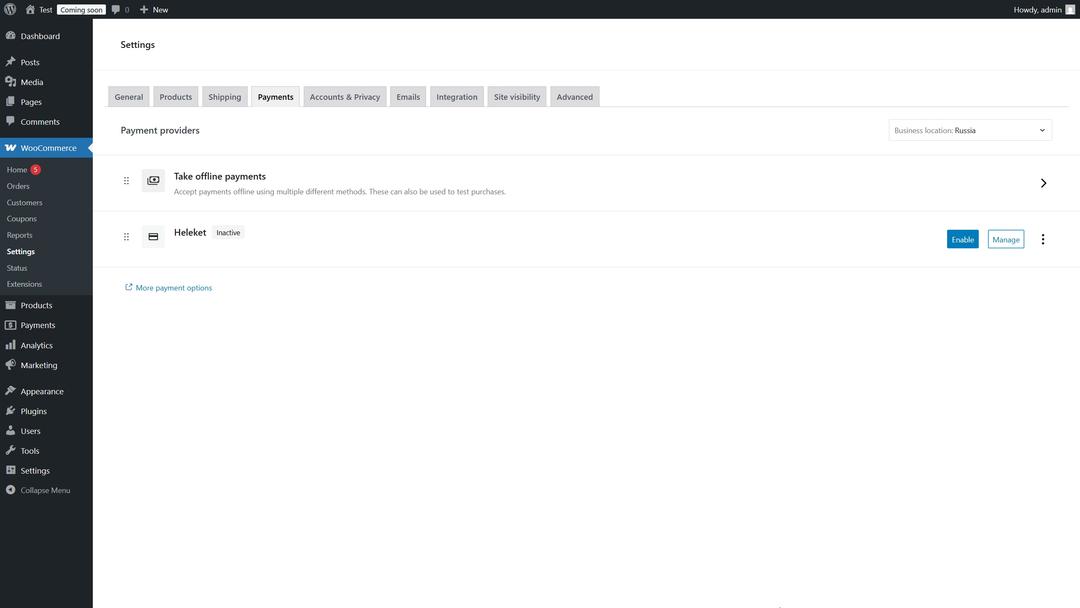
Step 4. Activate the plugin. After installation is complete, the button will change to "Activate Plugin" — click it. The plugin is now ready to work, and in the WooCommerce admin panel under "Payments," a Heleket entry will appear whose settings will require entering the API key and merchant ID from your account on the service's website.
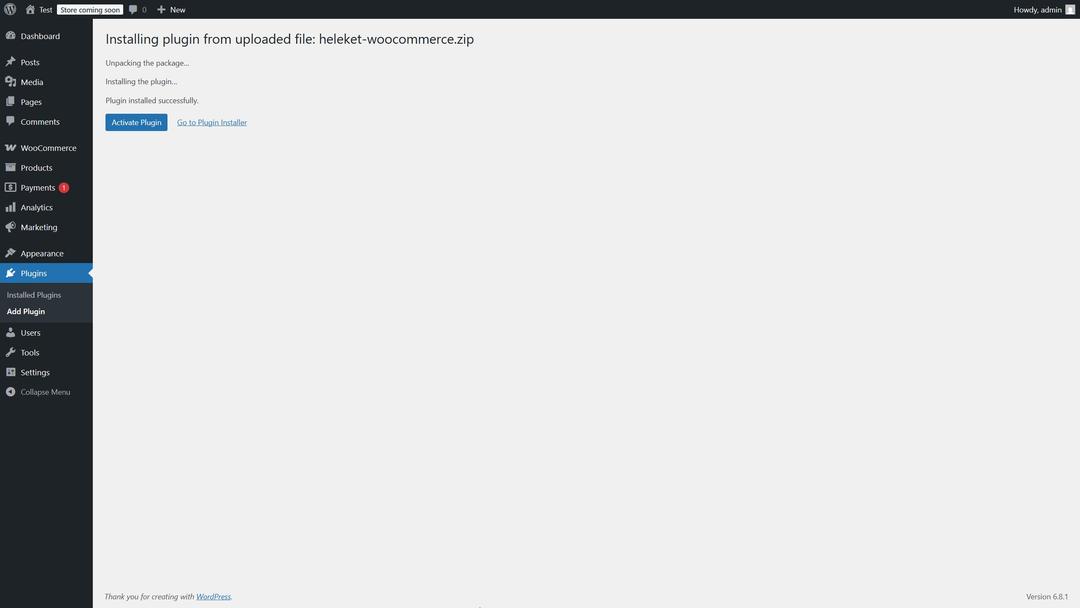
After installation, proceed to configuring the payment gateway through WooCommerce — "Settings" — "Payments." There you paste the API key and merchant ID obtained during Heleket registration, select supported coins and networks, and you're ready to run a test payment.
If you're installing the plugin not for a store but to accept payment for services or sell access to content, the logic is the same but without the WooCommerce section — use payment links created in the Heleket dashboard, or place payment buttons on site pages via shortcodes.
Setting Up the Heleket Payment Gateway for WordPress via API
For projects with non-standard logic, direct API integration is the right approach. Using Heleket as an example, here's how it looks.
Step 1. Enter the API key and Merchant ID that you previously received when creating the merchant. Go to your site's settings in the corresponding section and fill in the details.
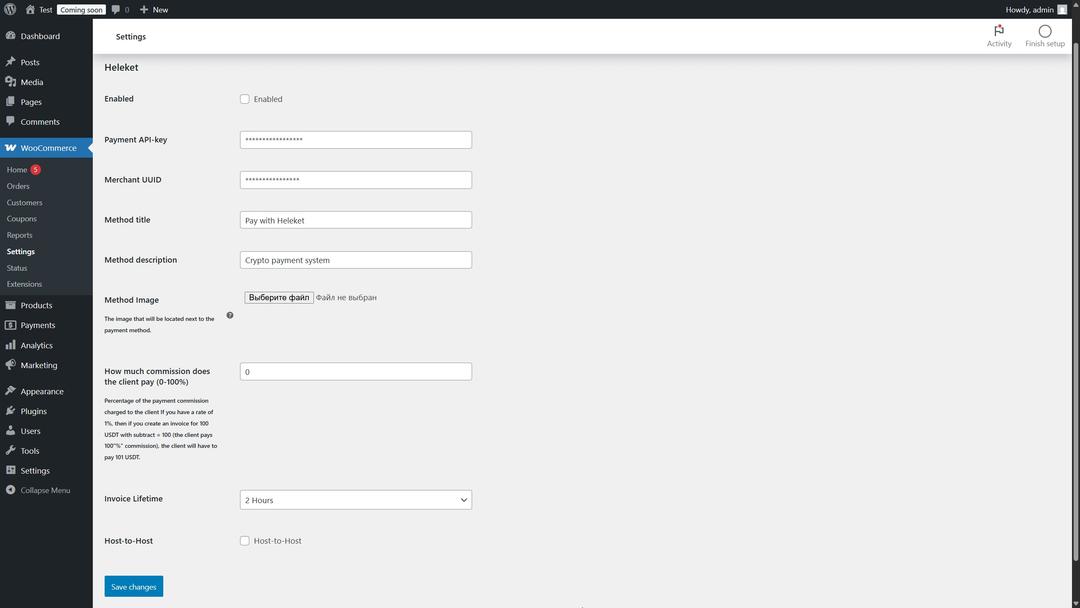
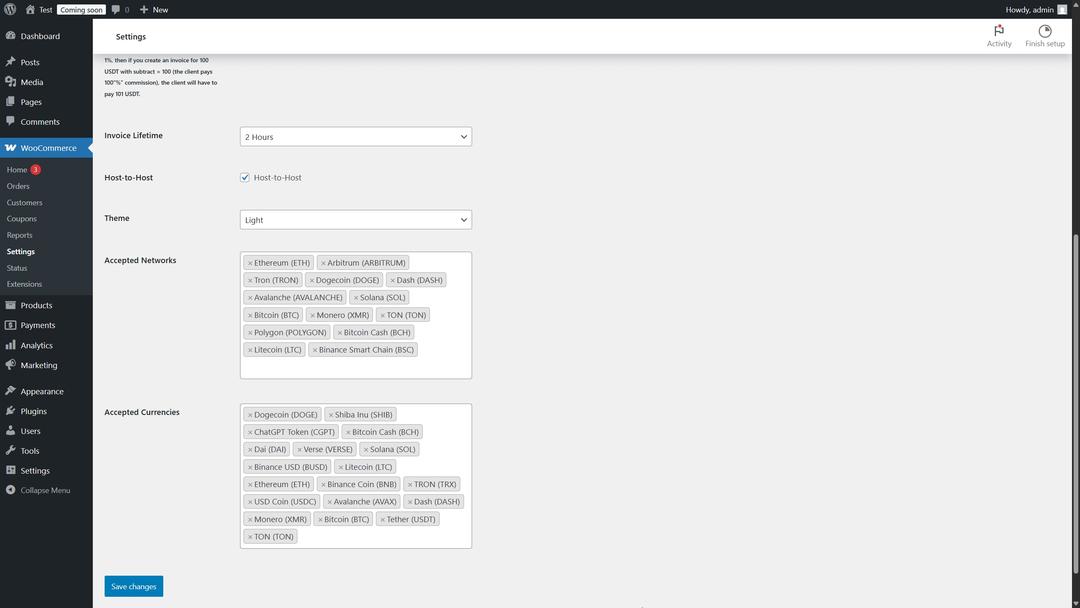
Step 2. Configure additional parameters. For example, which currencies will be accepted on your site and through which networks. We recommend selecting several options so that more users find it convenient to pay for your product.
Also, newer versions have a "Host-to-Host" parameter — it hides any mention of Heleket on the site. You can enable this setting if you'd rather not draw attention to the payment provider you're using.
Regarding customization: you can choose from ready-made themes (light or dark) or create your own. To do so, edit the files form_1.php and form_2.php in the folder from the previously downloaded archive: "wp-content" → "plugins" → "heleket" → "templates" → "custom."
Step 3. Activate the plugin. Once you've verified that all settings are configured correctly, you can enable the payment system. To do this, click the "Enable" button in the WooCommerce payment settings.
Step 4. Run test payments. Make sure webhooks are being processed correctly and order statuses are updating on time. If everything works properly, funds will be promptly credited to your account and you'll be able to continue successfully using the payment system.
API integration with Heleket takes an average developer anywhere from a few hours to a day, depending on the complexity of the site's existing logic.
How to Choose a Cryptocurrency Acceptance Service
There are dozens of crypto acquiring services on the market, and when working with WordPress it's important to choose one that supports convenient integration with this CMS. Here's what to look for when choosing.
Availability of a ready-made plugin for WooCommerce and WordPress. If there isn't one, you'll have to do the integration via API — which is no longer 15 minutes but hours of developer work. A good service publishes its plugin in the official WordPress.org directory, where it can be installed in one click.
Support for popular coins and networks. The wider the choice, the higher the conversion. At a minimum, there should be BTC, ETH, USDT, and USDC on multiple networks.
Commission size. The base rate among services varies from 0.4% to 2%. At volume the difference becomes significant, so look at the total cost of transaction processing, not just the advertised percentage.
Auto-conversion to stablecoins. Without it, you'll always be dependent on the exchange rate of whatever cryptocurrency the payment arrived in.
Speed and quality of support. Check before connecting — write a simple question to the chat and time the response. If the answer came a day later, you'll be on your own when a real payment problem arises.
API documentation. Even if you plan to use the plugin, you may eventually need to customize something. The documentation should be clear, with code examples and descriptions of typical scenarios.
Heleket meets all these criteria. There's an official plugin for WooCommerce, popular cryptocurrencies and networks are supported, commission from 0.4%, auto-conversion to USDT/USDC is available, the API is documented, and support operates around the clock via chat, email, and Telegram. For WordPress projects of any size, this is a reliable and predictable solution.
Common WordPress and WooCommerce Errors
When setting up crypto payment, things sometimes go wrong. Here are the three most frequent problems and how to solve them.
API Connection Issues
Symptom — the plugin is installed and activated, but crypto payment doesn't appear at checkout or shows an "invalid API key" error. What to check. First, whether the key was copied correctly from the payment service dashboard — a common cause is an extra space at the beginning or end of the string. Second, whether the domain specified in the project settings on the service side matches the site's actual domain. Third, whether there's a conflict with other payment plugins — to test, disable all other payment methods and see if the crypto checkout starts working.
Payment Display Errors
Incorrect Order Status Updates
Symptom — the client paid, the money arrived, but the order in WooCommerce is stuck at "pending payment" status. The cause is almost always webhooks — the notification from the payment service doesn't reach the site or isn't processed. Check that the webhook URL in the project settings matches the site's actual address (correct domain, https, no typos). If the site is blocked from external access by a firewall or via .htaccess, add the payment service's IP addresses to the whitelist. Also check the WordPress and PHP error logs — sometimes the problem isn't in the webhook itself but in an exception thrown during processing due to a conflict with another plugin.
General advice — always make a test payment before launch and check the entire cycle. Five minutes of testing saves hours of dealing with support and unhappy clients.
Conclusion
WordPress is a flexible platform with ready-made solutions for any task, and cryptocurrency acceptance is no exception. An online store on WooCommerce will benefit from a payment service plugin that takes 15 minutes to install and immediately adds crypto payment to checkout. A small project without a store needs only a regular plugin with shortcodes for payment buttons. A complex custom site requires API integration that gives full control.
The key factor when choosing a service is the availability of a ready-made WordPress plugin, low commission, support for popular coins, auto-conversion to stablecoins, and quality documentation. Heleket covers all these points and is suitable for WordPress projects of any size — from a small blog with paid access to a large online store with thousands of orders per month.
Launching cryptocurrency acceptance on WordPress can be done in literally a couple of hours. Register with the service, install the plugin, paste the API key, select coins, make a test payment — and from there everything runs on its own. And access to a global audience and savings on commissions pay for the setup within the first few dozen transactions.


